Lately I came across a rather big problem of vagrant: Increasing the disk space, because the normal 40GB were in use. There are options to increase RAM or CPU count easily. You can change it like this:
config.vm.provider "virtualbox" do |vb|
    vb.memory = 4096
    vb.cpus = 4
end
So my thoughts were, that there must be a similar option to disk space as well, but there wasn’t. After some research I found out, there was no easy solution to that. There are already some solutions though, but nothing worked for me completely. I’m currently mainly using kaorimatz ubuntu 16.04 iso. One point which wasn’t working for me is, that other machines used lvm2 as a volume manager. Second problem was, that some people’s new increased hdd’s got attached automagically to the vagrant machine, even though it should give an UUID conflict. So I had to go for my own solution, which is a combination of various solutions out there. I hope this is of any use for someone else out there, who was as frustrated as I was.
The Solution
First things first: This solution is for machines, which use VirtualBox as their virtualisation platform. If you use VirtualBox, we can go on. The first thing you have to do is turn your running vagrant machine off (vagrant halt or vagrant suspend). Next we need to find the actual VMDK file, which represents the HDD of the machine. If you have installed VirtualBox with the standard procedure, your machine should be here:
/home/<your username>/VirtualBox\ VMs/<name of the vm>/<name-of-the-disk>.vmdkVMDK is a type, which can’t be resized. So, after we switched into the directory, the first thing we will do is converting it to VDI
VBoxManage clonehd <name-of-the-disk>.vmdk tmp-disk.vdi --format vdiNow we are able to increase it
VBoxManage modifyhd tmp-disk.vdi --resize <size-in-MB>As an example, if we want to have 60GB as the new size, the command would look like this
VBoxManage modifyhd tmp-disk.vdi --resize 61440Now we convert it back to VMDK
VBoxManage clonehd tmp-disk.vdi resized-disk.vmdk --format vmdkThe next thing we need to do, is closing the SATA controller to the old disk
VBoxManage storageattach <name-of-the-vm> --storagectl "IDE Controller" --port 0 --device 0 --medium noneHere are two things, you need to take care of. First thing is
<StorageControllers>
  <StorageController name="IDE Controller" type="PIIX4" PortCount="2" useHostIOCache="true" Bootable="true">
    <AttachedDevice type="HardDisk" hotpluggable="false" port="0" device="0">
      <Image uuid="{42b28bc6-a130-45be-9603-ee16779459d5}"/>
    </AttachedDevice>
  </StorageController>
</StorageControllers>
As you can see, we are interested in the name of the StorageController tag. If there is something else than “IDE Controller”, you need to use that name for the –storagectl flag instead. Now we need to close the old medium
VBoxManage closemedium disk <name-of-the-disk>.vmdkWhen it is closed, we can attach our new resized VMDK
VBoxManage storageattach <name-of-the-vm> --storagectl "IDE Controller" --port 0 --device 0 --type hdd --medium resized-disk.vmdkHere you need to watch out for the same things, as in the last storageattach command. Now you should be able to restart your vagrant machine (vagrant up). Afterwards SSH into it (vagrant ssh). Now you can check your disk space with
df -hIf there is your new size already, you are done. But if you are like me and still have the old size, we need to do some more steps. Namely we need to create a partition with the new space and resize our filesystem to that space. The following images are used from my example of increasing the disk from 40GB to 60GB, but there shouldn’t be a difference in doing the same for other sizes. First we need to search for our HDD
sudo fdisk -lThere are some USB drives and the last entry should look like this

Here we are interested in what comes after Disk. This should always be /dev/sda. If not, you continue using that name instead of /dev/sda. Next execute
sudo fdisk /dev/sdaYou should have entered the fdisk prompt now, which looks like this

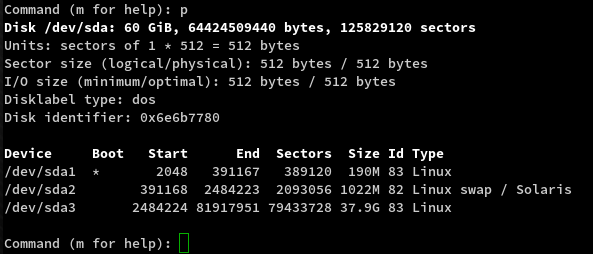
Now type in p and Enter to execute. This should call the current partition table

Here /dev/sda1 should be the boot partition, /dev/sda2 is the swap partition and /dev/sda3 is the actual partition, which should be resized. If yours isn’t /dev/sda3, change the following commands to your partition name. First we delete the current /dev/sda3 partition by typing in d and Enter. Now you should get to choose which one. We want to delete the 3. So we type in 3 + Enter.

Now we create a new one with n + Enter. Next we choose p for a primary partition. The new partition number will be 3 again and the next two questions for first and last sector will just be accepted with the default value by pressing Enter.

As you can see we now have a new partition 3 with size 58.8 GB. To save the changes, we have made so far, type in w + Enter. This will result in an error like this

As the messages tells us, the changes can’t be applied until a restart. That’s why we do exactly that. We leave the machine via exit and execute:
vagrant reloadAfter a few moments you should be able to re-SSH into your vagrant machine. The last thing we need to do is resize our file system to the new partition size.
sudo resize2fs /dev/sda3If you do
df -hagain, you should now see the new size you’ve always wanted.